Creating Custom CBD Tincture Boxes starts with explicit rules and statistics. Over the past several years, the U.S. CBD market expanded rapidly. The industry projections show North American CBD sales in the billions, with tinctures continuing as a best-selling form. Retailers and authorities anticipate correct labeling, child-safety mechanisms, and uniform size.
A good dieline guards your product on shelves and during delivery, avoids delays, and reduces costs. Measure your bottle, and prepare for inserts. After that, account for normal print tolerances. For accuracy, use millimeters. You have to set the bleed at 3 mm. Moreover, you should keep text at least 3–5 mm away from cut edges.
Guide to Create a Retail-Ready Dieline for Custom CBD Tincture Boxes
Following these instructions will help you create a dieline for your bottle. It meets American packaging requirements, exudes professionalism, and fits.
Gather Exact Product Measurements
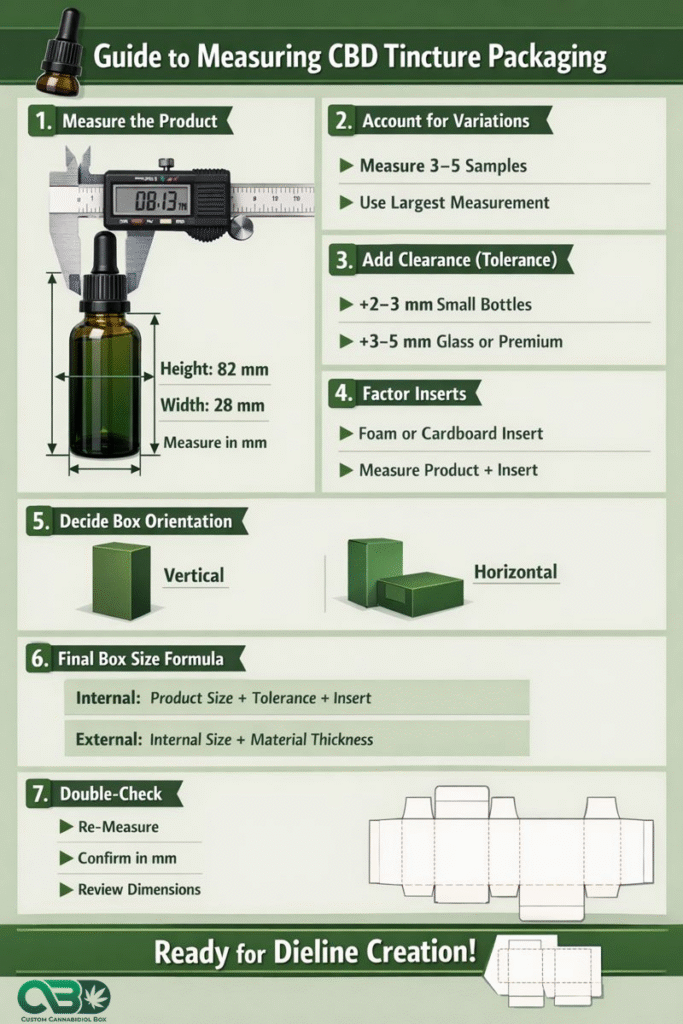
Measure each component of the dropper and bottle. For accuracy, utilize a caliper. Record these important figures in millimeters:
- Bottle height (with cap): usually ranges from 70 to 110 mm.
- Bottle diameter: usually ranges between 20 and 45 mm.
- Dropper length (assembled): add 10–15 mm clearance.
- Be aware of shoulders and threads in cap diameter and neck finish.
Guidelines to Follow:
- Measure the bottle with the cap and dropper fully assembled.
- Measure the widest point and the base separately.
- Add 2–4 mm clearance per side for insertion and removal.
- Add 3–5 mm if you plan foam or cardboard inserts.
Why this matters: printers and die cutters work in millimeters. A 1–2 mm error can cause misfits or crushed bottles. Record tolerances and include them on the dieline notes. Include the product weight if you plan internal supports or a rigid box.
Choose Box Style Material and Structure
Select Custom Printed CBD Tincture Packaging design appropriate for your shipping requirements and company. Tincture packaging typically comes in tuck end, sleeve, and two-piece hard boxes. Match weight and apparent value with resources:
- Thickness of paperboard: 12–24 pt for single bottles.
- Use corrugated for large shipments or kits with several bottles.
- Matte, glossy, or soft-touch coatings influence price and feel.
Steps to Follow:
- Choose a tuck end for low cost and fast assembly.
- Choose a rigid two-piece for premium presentation; add 2–4 mm extra for internal trays.
- Add tamper-evident seals or perforations if required by retailers or state rules.
Design notes: mark glue flaps, perforations, and window cutouts on the dieline. Account for material thickness when placing creases and glue tabs. If you plan embossing or foil, leave 2–3 mm clear around artwork to avoid mis-registration. By doing so, you can get your desired Custom Tincture Boxes wholesale.
Set Up Artboard and Layers in Software
Use Adobe Illustrator or similar vector software. Set your artboard to the flat, final dieline size. Follow these steps:
- Create separate layers: Cut, Crease, Glue, Artwork, Bleed.
- Draw cut lines as solid strokes and crease lines as dashed strokes.
- Lock the cut and crease layers to avoid accidental edits.
Key settings:
- Bleed: 3 mm on all sides.
- Safe zone: 3–5 mm inside cut lines for text and logos.
- Image resolution: 300 DPI for raster images.
Export formats: AI according to printer specifications; PDF/X-1a. Define fonts or incorporate them. Show a CMYK color proof and make sure to add Pantone references for spot colors. When printing, keep vector cut lines only on a different, unlocked layer.
Draw Cut Lines Creases and Glue Tabs
Lay out the flat box precisely. Use millimeter measurements and label each panel. Include these elements:
- Cut lines: outer edges where the die will cut.
- Crease lines: where the box folds; place them inside the cut line by material thickness.
- Glue tabs: width depends on machine; typical 10–15 mm.
Rules to Remember:
- Measure panel widths to match bottle plus clearance.
- Add 2–4 mm to panel widths for insertion tolerance.
- Set glue tab width to 12 mm for most automatic gluing machines.
Add callouts on the dieline for grain direction, which affects folding and strength. Mark the top and bottom panels clearly. If you include a window, draw the window cut and add a 1–2 mm margin for film attachment.
Add Bleed Safe Zone and Print Marks
Protect your artwork from trimming errors. Use standard print margins and marks:
- Bleed: 3 mm beyond cut lines.
- Safe zone: 3–5 mm inside cut lines for text and critical graphics.
- Trim marks: include crop marks and registration marks.
Steps to apply:
- Extend background colors and images into the 3 mm bleed.
- Keep all text and logos at least 3–5 mm from the cut line.
- Add color bars and registration marks for the press.
Resolution and color: use 300 DPI images and convert to CMYK. For spot colors, list Pantone numbers. Include a dieline legend that explains line types and layer names for the printer.
Design Artwork for Panels and Structural Notes

Place branding and regulatory text with clarity. Reserve space for required labels and codes. Follow these steps:
- Allocate one panel for ingredient list, net weight, and batch code.
- Reserve a panel for directions and warnings; keep text legible at 6–8 pt minimum.
- Place barcode and UPC on the bottom or a side panel with at least 20 mm x 20 mm clear area.
Layout tips:
- Use a minimum font size of 6–8 pt for legal text.
- Keep logos and main graphics at least 10 mm from edges.
- Leave 10–15 mm clear for embossing or foil stamping.
Add dieline notes for varnish, foil, emboss, and spot UV. Mark where child-resistant features or tamper seals attach. If you include a leaflet, add a tuck or pocket dimension on the dieline. You can use Custom CBD Display Boxes to showcase your products professionally.
Create Physical Mockups and Test Fit
Always test a paper mockup before press. Use the same thickness or a close substitute. Steps to test:
- Print the dieline at 100% scale on similar-weight stock.
- Cut and fold along the lines.
- Insert the bottle and dropper; check clearance and fit.
Adjustments to expect:
- Move glue tabs by 1–2 mm if the box sits too tight.
- Increase side clearance by 1–3 mm if insertion feels tight.
- Shift artwork 3–5 mm inward if trimming cuts into design.
Run at least two mockups: one for fit and one for final artwork alignment. Order a press proof from the printer and test the actual material and finish before full production.
Finalize Files and Communicate with Printer
Prepare final files and confirm specs with your printer. Include these items:
- Final dieline with cut, crease, and glue layers.
- Artwork files with bleed and safe zones.
- Color specs: CMYK and Pantone numbers.
- Special finishes: varnish, foil, emboss details.
Points to Note:
- Press proof quantity and cost.
- Lead time in days; typical runs take 7–21 days depending on complexity.
- Minimum order quantity (MOQ); many printers set MOQs like 250–1,000 units.
Ask the printer for a PDF proof and a physical press proof. Confirm dieline tolerances and die-cutting methods. Lock the dieline layer and send editable files only if the printer requests them.
Mistakes to Avoid in CBD Tincture Box Dielines
- Bottle Fit: Wrong dimensions → box too tight/loose.
- Dropper Height: Forgetting taller droppers.
- Flap Strength: Weak locks → box pops open.
- Child Safety: Ignoring child-resistant rules.
- Glue Tabs: Misplaced tabs ruin look.
- Seal Space: No room for shrink-wrap/tamper seals.
- Die Cuts: Overcomplicated cutouts weaken the box.
- Bleed Margins: Poor bleed → white edges.
- Batch Coding: No blank space for stamps.
- Label Rules: Missing FDA text areas.
- Paperboard: Too thin → collapse risk.
- Retail Needs: No flat barcode/shelf space.
- Sustainability: Excess folds’ waste material.
Table Showing How to Design Dielines for Custom CBD Tincture Packaging
| Step | Key Action | Measurements/Specs | Notes |
|---|---|---|---|
| Gather Product Measurements | Measure bottle & dropper | Height: 70–110 mm; Diameter: 20–45 mm | Add 2–4 mm clearance; record tolerances |
| Choose Box Style | Select packaging type | Tuck end, sleeve, rigid two-piece | Match weight/value; add seals if required |
| Set Up Artboard | Create layers in software | Cut, Crease, Glue, Artwork, Bleed | Bleed: 3 mm; Safe zone: 3–5 mm |
| Draw Cut Lines & Tabs | Lay out dieline | Glue tab: 10–15 mm | Mark grain direction; add window margin |
| Add Bleed & Print Marks | Extend artwork safely | Bleed: 3 mm; Safe zone: 3–5 mm | Include crop marks, color bars, registration |
| Design Artwork Panels | Place branding & text | Font size: 6–8 pt min | Reserve space for barcode, warnings, foil |
| Create Mockups & Test Fit | Print & fold sample | Adjust tabs: ±1–2 mm | Run at least two mockups; order press proof |
| Finalize Files & Communicate | Send dieline & artwork | Formats: AI, PDF/X-1a | Confirm specs, MOQ, lead time, finishes |

Ready to Produce Your Custom CBD Tincture Boxes
Order a proof or request a dieline template now to test fit, confirm child-safety features, and speed your launch. I can create a printable dieline checklist or a mockup guide tailored to your bottle dimensions and preferred box style. Get your Custom CBD Tincture Boxes dieline right the first time from the CustomCBDboxes to avoid costly reprints.
FAQs
What is a dieline and why does it matter?
A dieline is the flat template. It shows where to cut, fold, and glue. Printers use it to make the die. This die cuts your box. A correct dieline prevents miscuts, wasted material, and delays. It also ensures artwork aligns with folds and panels.
What bleed and safe zone should I use?
For this purpose, follow these steps.
- Add 3 mm bleed on all sides.
- Keep a 3–5 mm safe zone inside the cut lines.
- Place logos and text at least 3–5 mm away from the trim.
- Convert all 300 DPI images to CMYK for printing.
How do I measure my tincture bottle for a dieline?
- Use a caliper for accuracy.
- Record height, diameter, neck finish, and dropper length.
- Add 2–4 mm side clearance and 10–15 mm extra for dropper length.
- Sketch the bottle on paper and note tolerances for the dieline.
What box styles work best for tinctures?
- Tuck end for low cost and fast assembly.
- Sleeve for added branding and a two-piece look.
- Rigid two-piece for premium presentation. Choose based on display needs, shipping, and budget.
How do I mark special finishes on the dieline?
- Add callouts for foil, emboss, and spot UV.
- Leave 2–3 mm clear around these areas to avoid misregistration.
- Provide a separate layer or PDF showing finish locations.